How I Embroidered a Carrot Garden on a Tote Bag (and Added a Secret Pocket)
There is something wonderfully satisfying about turning a plain canvas tote into something that makes people stop and stare. This project has been living in my head for a while — carrots growing from a little pocket, their roots dangling below like tiny, intricate threads of life. The moment I finished it, I knew it was one of my favourite things I have ever stitched.
Let me walk you through how it all came together.
The Idea
It started, as most of my projects do, with a sketch. I wanted the design to feel like a little scene — a row of carrots planted in a pocket, their feathery tops reaching upward and their roots spilling down below the fabric. The pocket would act as the "soil," half-concealing the carrots, while the roots would hang freely beneath it, almost like the bag had its own underground world.
I played with the scale on paper before touching the fabric. Getting the proportions right is everything with tote bag embroidery — you want the design large enough to be seen but still balanced on the surface of the bag.
What You Will Need
- A plain natural canvas tote bag
- A piece of blue cotton or denim fabric for the pocket (roughly 11,5 × 9 cm)
- Embroidery thread in shades of orange, red, and yellow (for the carrots and roots), dark green and grey-green (for the tops), and blue (to attach the pocket)
- An embroidery hoop — large enough to fit the design area
- A water-soluble or air-erasable fabric pen
- Embroidery needle
- Small scissors
- Binder clips or pins to hold the bag steady while you work
Step 1: Draw the Design Directly onto the Bag
Lay the tote bag flat on a table. Using your erasable fabric pen, sketch the full design freehand directly onto the canvas. I drew the outline of the pocket rectangle first, then the row of carrot silhouettes sitting along the top edge of it, and finally the branching root systems below.
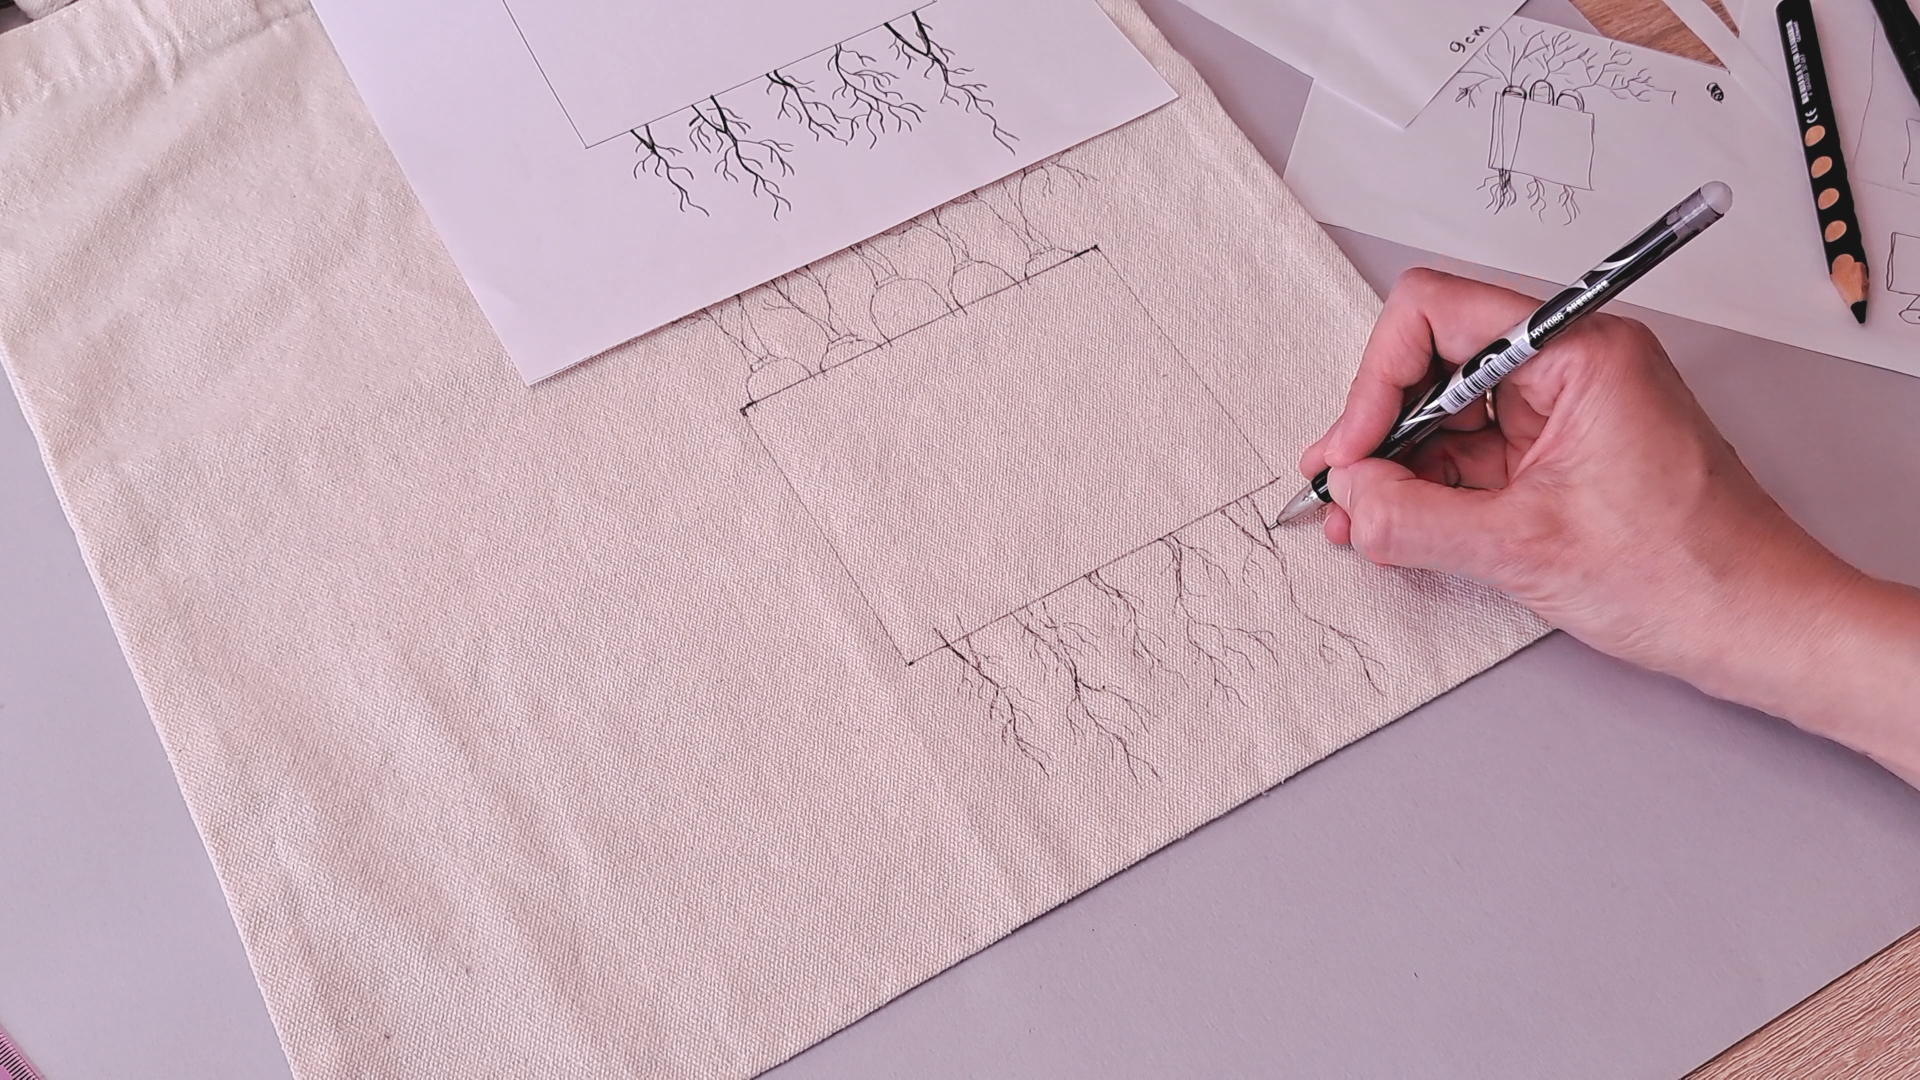
Drawing directly onto the fabric feels intimidating at first, but the canvas surface is very forgiving. If you prefer, you can trace a printed design using a light box or a sunny window. The key is to get all the fine root details down before you start stitching — they are the most time-consuming part, and having a clear guide makes a huge difference.
Step 2: Stitch the Roots (Below the Pocket Line)
This is the part I love most and also the part that takes the longest. The roots are worked entirely in back stitch for the main branches and long and short stitches to fill in the thicker parts near the base of each carrot. I used several shades of orange and yellow to give each carrot root a slightly different character — some are darker and bolder, some are lighter and more delicate.
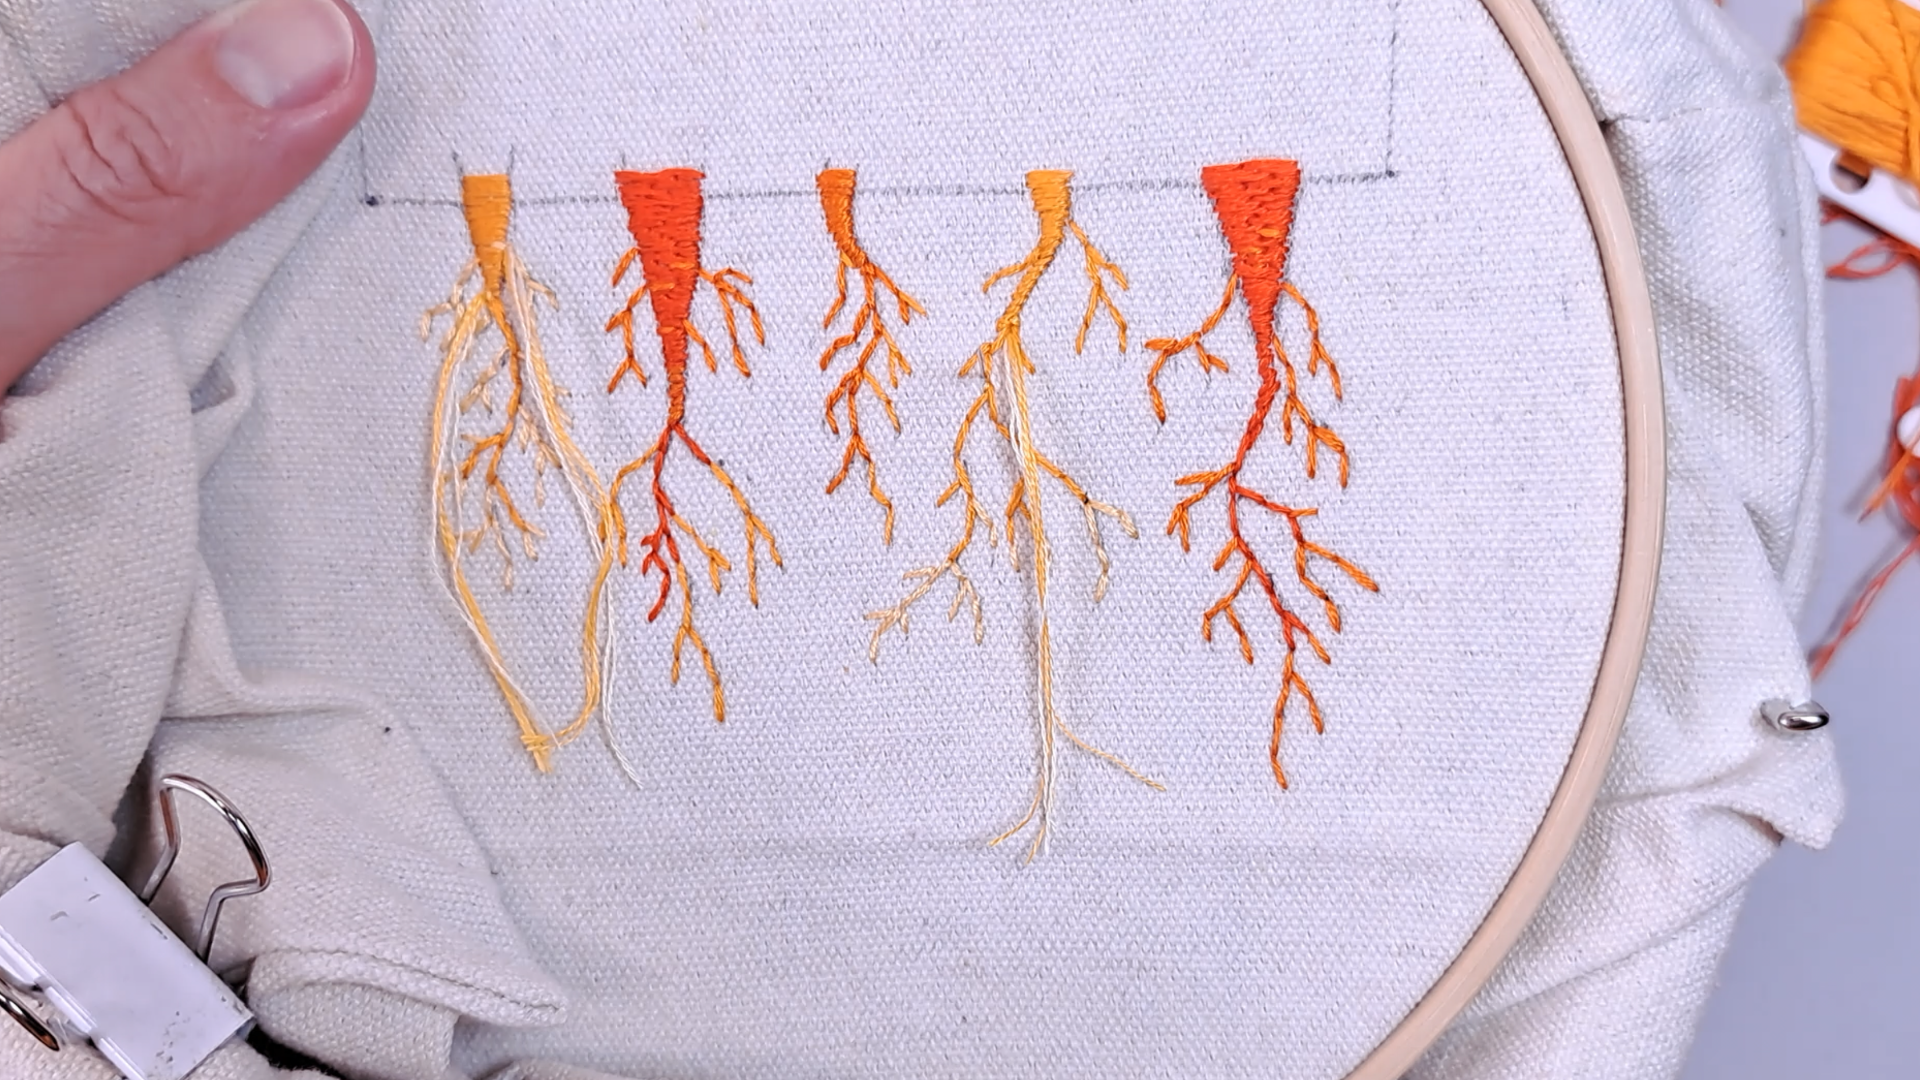
Because the bag is quite thick, I used binder clips at the bottom to keep the fabric taut. Start from the base of where each carrot will sit and work outward into the branching tips. Let the lines taper as they go — the finest ends of the roots can be done with just a single strand of thread for a realistic, delicate effect.
Take your time here. The roots are what make this design feel alive.
Step 3: Stitch the Carrot Bodies
Once the roots are finished, work the carrot bodies using long and short stitches to create a smooth, rounded shape. I blended two shades of orange in each carrot — brighter yellow-orange in the centre fading to a deeper red-orange at the edges. This gives each one a little glow, as if the light is hitting them just right.
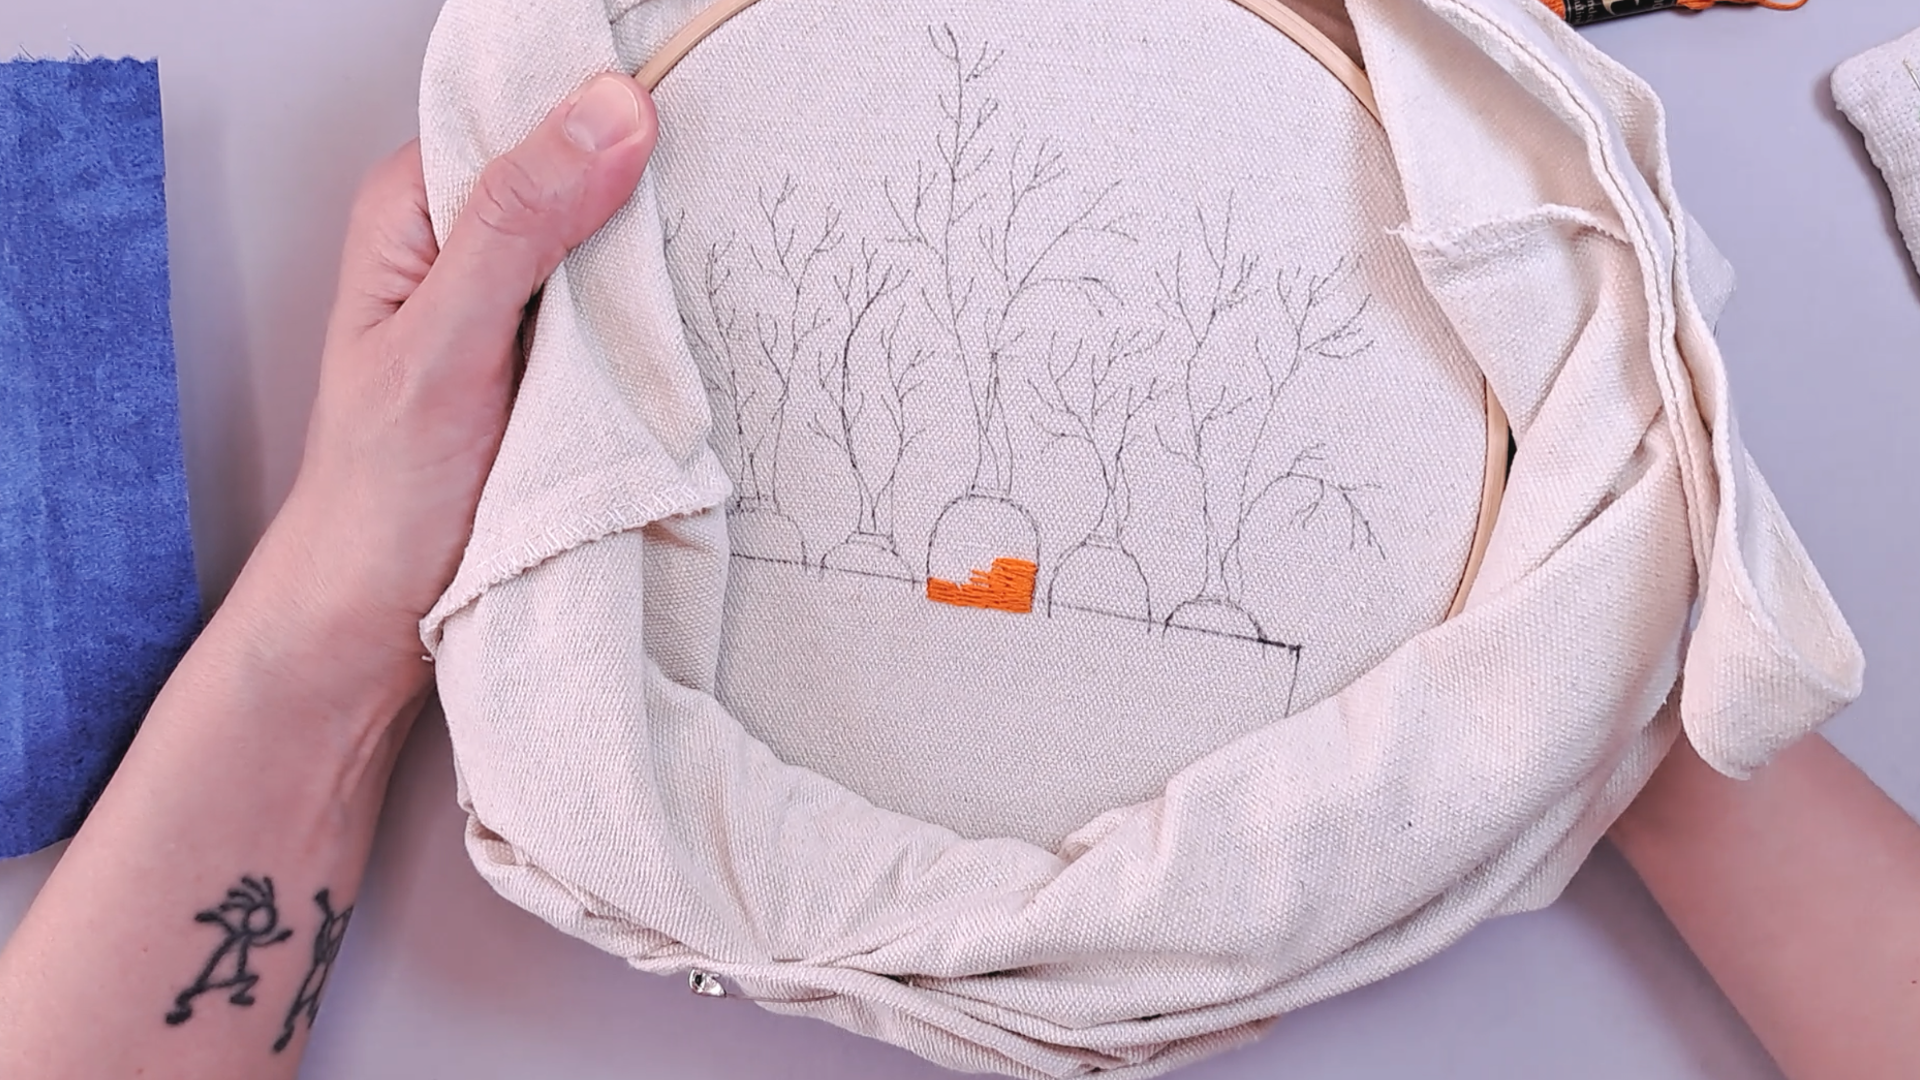
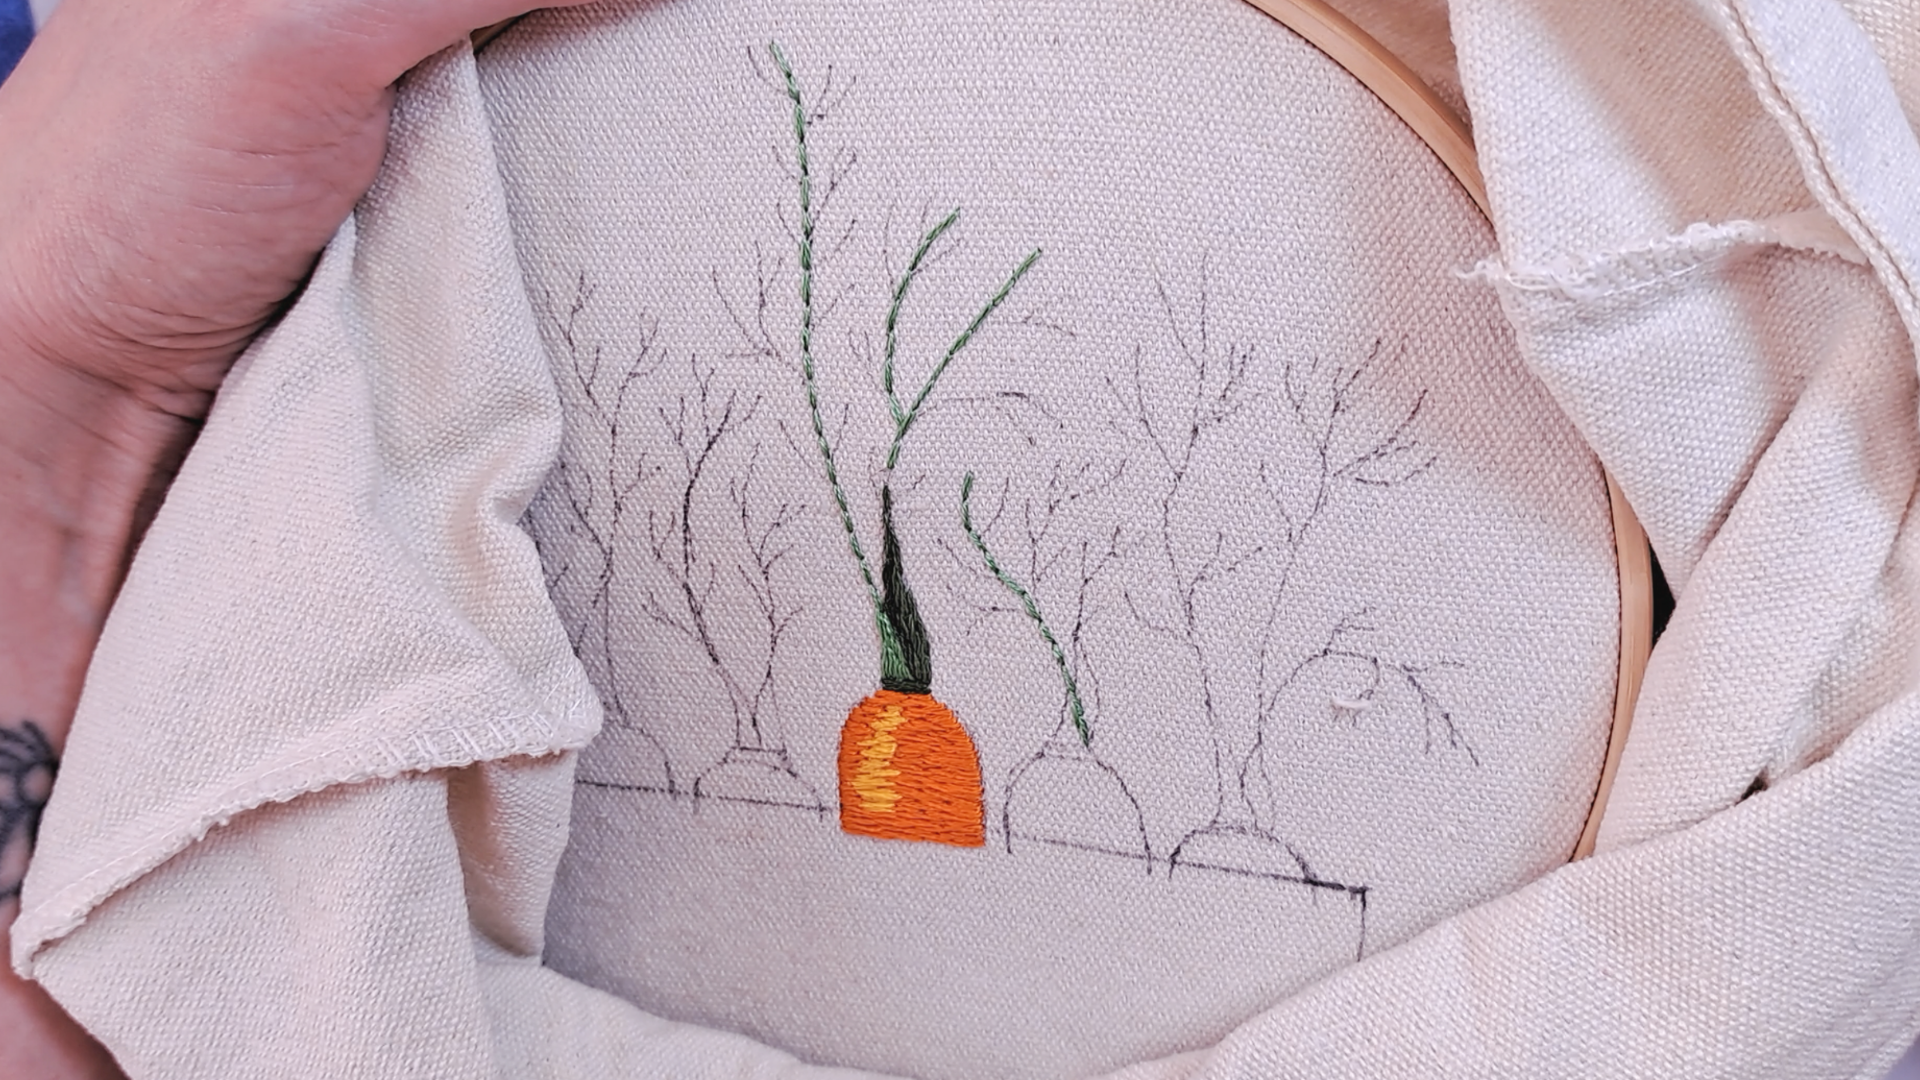
The tops of the carrots, where the greens emerge, are worked in very dark green thread, just a few stitches to suggest the base of the stem.
Step 4: Make and Attach the Fabric Pocket
Cut a rectangle of blue fabric slightly larger than your planned pocket size (to allow for folded edges). Fold and press the top edge under by about 1 cm, then secure it with a running stitch or back stitch in matching blue thread along the fold line.
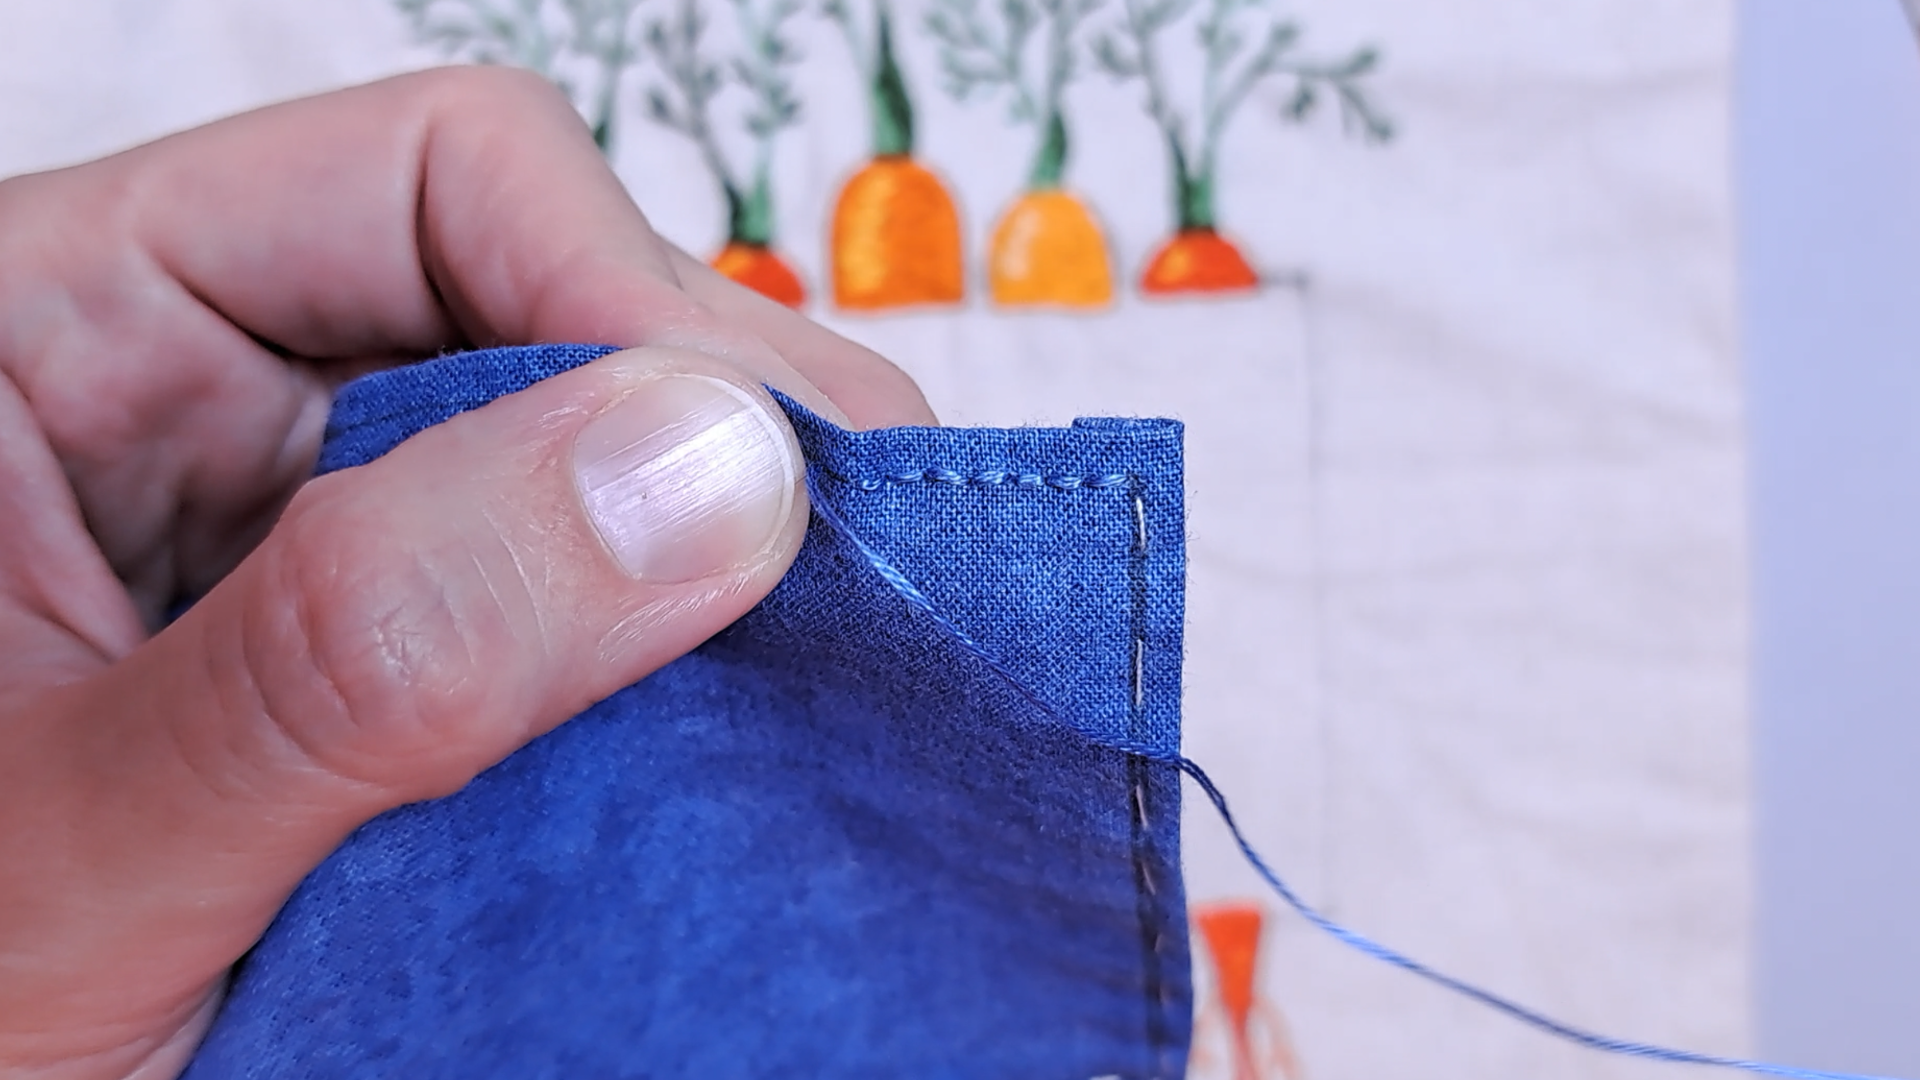
Place the pocket over the bag, aligning it with the drawn rectangle so it sits just below the carrot bodies, covering the base of each carrot as if they are growing out of it. Hand-stitch the pocket to the bag along the sides and bottom using back stitch in blue thread. Leave the top open — this really is a functional pocket, which I find endlessly charming.
Step 5: Stitch the Carrot Tops
With the pocket attached, move back into the hoop to stitch the feathery green tops. These are worked in back stitch and long and short stitches, using dark green thread for the main stems and a lighter grey-green for the delicate branching leaves. The tops should feel loose and organic — they do not need to be perfect. Real carrot tops are wonderfully chaotic, and that is exactly the mood to go for.
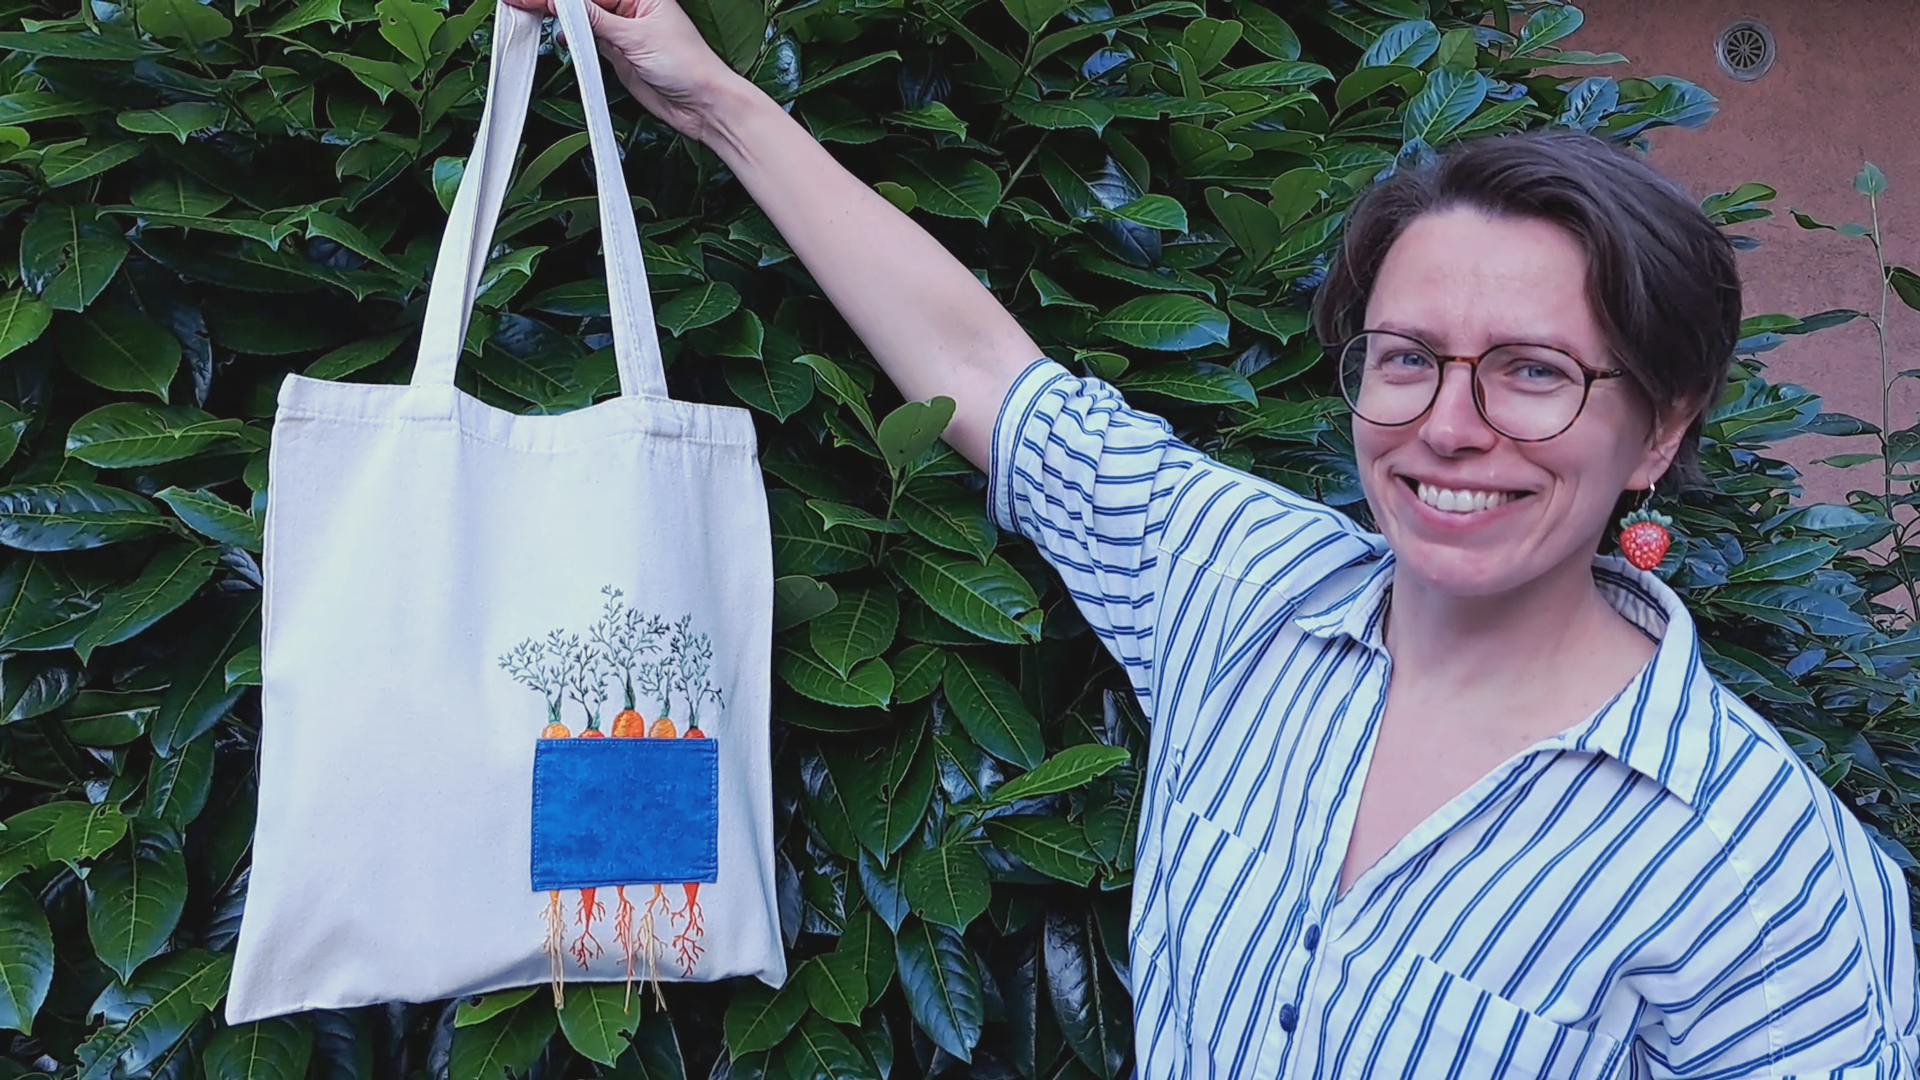
The Finished Bag
When you hold it up, the whole scene comes together: the lush green tops waving above, the bold orange carrots nestled in their fabric pocket, and the intricate roots trailing below. It is a bag that tells a story, and I promise you, people will stop you in the street to look at it.
This project took me several sessions to complete, and I enjoyed every single one of them. There is something meditative about stitching all those tiny root branches, one careful back stitch at a time.
If you would like to see the full process — the sketching, the stitching, the pocket-making, all of it — I documented everything in a video on my YouTube channel. You can watch it here: How I Embroidered a Carrot Tote Bag
Have you ever embroidered a tote bag? I would love to see what motifs you chose — drop your photos or ideas in the comments below! ⬇️